
转自:http://blog.csdn.net/chenxingzhen001/article/details/7615012
一、环境
| 用途 | ip | os | memory |
| 调度器 | 172.16.48.204 | CentOS 5.5 64bit | 32G |
| sql节点1 | 172.16.48.206 | CentOS 5.5 64bit | 32G |
| sql节点2 | 172.16.48.207 | CentOS 5.5 64bit | 32G |
| sql节点3 | 172.16.48.208 | CentOS 5.5 64bit | 32G |
| sql节点4 | 172.16.48.211 | CentOS 5.5 64bit | 32G |
VIP设置为:172.100.100.251 (注:不能和调度器、sql节点在一个网段上)
在调度器172.16.48.204电脑上,用route add default dev eth1
命令添加路由,使得172.16.48.204节点有对100网段的访问权限。
二、架构图
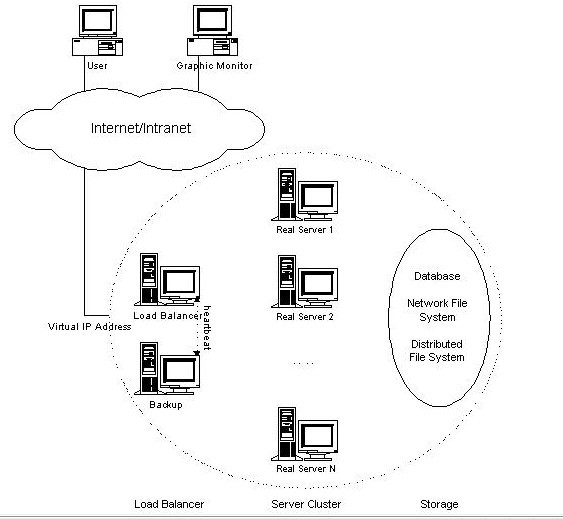
这里调度器只用了一个节点,没有设置Backup
三、软件下载
lvs: http://www.linuxvirtualserver.org/software/kernel-2.6/ipvsadm-1.24.tar.gz
keepalived: http://www.keepalived.org/download.html
四、软件安装
编辑lvs的时候需要操作系统的内核,不然会报错
configure: error:
!!! OpenSSL is not properly installed on your system. !!!
!!! Can not include OpenSSL headers files. !!!
解决方法:yum install openssl*
可能 还会报错:libipvs.c:253: 错误:提领指向不完全类型的指针
解决方法:yum -y install kernel-devel 可参考:http://692344.blog.51cto.com/blog/682344/804278
如果还是不行,可能是由于lvs keepalived的版本过高
1.在调度器172.16.48.204上安装lvs
ln -s /usr/src/kernels/2.6.18-164.el5-i686/ /usr/src/linux
tar zxvf ipvsadm-1.24.tar.gz
cd ipvsadm-1.24
make && make install
2.在调度器172.16.48.204上安装keepalived
tar zxvf keepalived-1.1.19.tar.gz
cd keepalived-1.1.19
./configure --prefix=/usr/local/keepalived
make
make install
cp /usr/local/keepalived/sbin/keepalived /usr/sbin/
cp /usr/local/keepalived/etc/sysconfig/keepalived /etc/sysconfig/
cp /usr/local/keepalived/etc/rc.d/init.d/keepalived /etc/init.d/
mkdir /etc/keepalived
3.配置keepalived.conf
vi /etc/keepalived/keepalived.conf
添加如下内容:
- global_defs {
- router_id HaMySQL_1
- }
- vrrp_sync_group VGM {
- group {
- VI_MYSQL
- }
- }
- vrrp_instance VI_MYSQL {
- state MASTER
- interface eth1
- virtual_router_id 100
- priority 100
- advert_int 1
- authentication {
- auth_type PASS
- auth_pass 1111
- }
- virtual_ipaddress {
- 172.100.100.251/24 etho label eth0:1
- }
- }
- virtual_server 172.100.100.251 3306 {
- delay_loop 6
- lb_algo rr
- lb_kind DR
- # nat_mask 255.255.0.0
- #persistence_timeout 50
- protocol TCP
- real_server 172.16.48.206 3306 {
- weight 3
- TCP_CHECK {
- connect_timeout 3
- nb_get_retry 3
- delay_before_retry 3
- connect_port 3306
- }
- }
- real_server 172.16.48.207 3306 {
- weight 3
- TCP_CHECK {
- connect_timeout 3
- nb_get_retry 3
- delay_before_retry 3
- connect_port 3306
- }
- }
- real_server 172.16.48.208 3306 {
- weight 3
- TCP_CHECK {
- connect_timeout 3
- nb_get_retry 3
- delay_before_retry 3
- connect_port 3306
- }
- }
- real_server 172.16.48.211 3306 {
- weight 3
- TCP_CHECK {
- connect_timeout 3
- nb_get_retry 3
- delay_before_retry 3
- connect_port 3306
- }
- }
- }
4.sql服务节点的配置
vi /etc/rc.d/init.d/realserver.sh 添加如下配置:
- #!/bin/bash
- # description: Config realserver lo and apply noarp
- SNS_VIP=172.100.100.251
- /etc/rc.d/init.d/functions
- case "$1" in
- start)
- ifconfig lo:0 $SNS_VIP netmask 255.255.255.255 broadcast $SNS_VIP
- /sbin/route add -host $SNS_VIP dev lo:0
- echo "1" >/proc/sys/net/ipv4/conf/lo/arp_ignore
- echo "2" >/proc/sys/net/ipv4/conf/lo/arp_announce
- echo "1" >/proc/sys/net/ipv4/conf/all/arp_ignore
- echo "2" >/proc/sys/net/ipv4/conf/all/arp_announce
- sysctl -p >/dev/null 2>&1
- echo "RealServer Start OK"
- ;;
- stop)
- ifconfig lo:0 down
- route del $SNS_VIP >/dev/null 2>&1
- echo "0" >/proc/sys/net/ipv4/conf/lo/arp_ignore
- echo "0" >/proc/sys/net/ipv4/conf/lo/arp_announce
- echo "0" >/proc/sys/net/ipv4/conf/all/arp_ignore
- echo "0" >/proc/sys/net/ipv4/conf/all/arp_announce
- echo "RealServer Stoped"
- ;;
- *)
- echo "Usage: $0 {start|stop}"
- exit 1
- esac
- exit 0
添加加可执行的权限
chmod +x /etc/rc.d/init.d/realserver.sh
注:四台sql节点都要进行此步操作
五、启动LVS节点(mysql cluster中的sql节点)
/etc/rc.d/init.d/realserver.sh start
六、启动调度器(keepalived的服务器端启动)
/etc/rc.d/init.d/keepalived start
启动后可以用命令 tail -f /var/log/messages 进行查看
若看到如下提示,则表示配置成功。
- [root@sg204 mysql-cluster]# tail -f /var/log/messages
- May 29 17:21:01 sg204 Keepalived_vrrp: Opening file '/etc/keepalived/keepalived.conf'.
- May 29 17:21:01 sg204 Keepalived_vrrp: Configuration is using : 63921 Bytes
- May 29 17:21:01 sg204 Keepalived_healthcheckers: Using LinkWatch kernel netlink reflector...
- May 29 17:21:01 sg204 Keepalived_vrrp: Using LinkWatch kernel netlink reflector...
- May 29 17:21:01 sg204 Keepalived_healthcheckers: Activating healtchecker for service [172.16.48.206:3306]
- May 29 17:21:01 sg204 Keepalived_healthcheckers: Activating healtchecker for service [172.16.48.207:3306]
- May 29 17:21:01 sg204 Keepalived_healthcheckers: Activating healtchecker for service [172.16.48.208:3306]
- May 29 17:21:01 sg204 Keepalived_healthcheckers: Activating healtchecker for service [172.16.48.211:3306]
- May 29 17:21:01 sg204 Keepalived_vrrp: VRRP sockpool: [ifindex(3), proto(112), fd(10,11)]
- May 29 17:21:02 sg204 Keepalived_vrrp: VRRP_Instance(VI_MYSQL) Transition to MASTER STATE
- May 29 17:21:03 sg204 Keepalived_vrrp: VRRP_Instance(VI_MYSQL) Entering MASTER STATE
- May 29 17:21:03 sg204 Keepalived_vrrp: VRRP_Instance(VI_MYSQL) setting protocol VIPs.
- May 29 17:21:03 sg204 Keepalived_healthcheckers: Netlink reflector reports IP 172.100.100.251 added
- May 29 17:21:03 sg204 Keepalived_vrrp: VRRP_Instance(VI_MYSQL) Sending gratuitous ARPs on eth1 for 172.100.100.251
- May 29 17:21:03 sg204 Keepalived_vrrp: VRRP_Group(VGM) Syncing instances to MASTER state
- May 29 17:21:03 sg204 avahi-daemon[4768]: Registering new address record for 172.100.100.251 on eth1.
- May 29 17:21:03 sg204 Keepalived_vrrp: Netlink reflector reports IP 172.100.100.251 added
- May 29 17:21:08 sg204 Keepalived_vrrp: VRRP_Instance(VI_MYSQL) Sending gratuitous ARPs on eth1 for 172.100.100.251
在调度器上用ipvsadm命令查看,可以看到如下信息
- [root@sg204 mysql-cluster]# ipvsadm
- IP Virtual Server version 1.2.1 (size=4096)
- Prot LocalAddress:Port Scheduler Flags
- -> RemoteAddress:Port Forward Weight ActiveConn InActConn
- TCP 172.100.100.251:mysql rr
- -> 172.16.48.211:mysql Route 3 0 0
- -> 172.16.48.208:mysql Route 3 0 0
- -> 172.16.48.207:mysql Route 3 0 0
- -> 172.16.48.206:mysql Route 3 0 0
七、远程应用通过vip访问mysql数据库
要远程应用程序访问mysql数据库,还需要一个远程访问的账号和密码,在mysql刚创建后,mysql是没有远程访问账号的,
在sql节点上增加远程认证客户:
grant 权限1,权限2,…权限n on 数据库名称.表名称 to 用户名@用户地址 identified by ‘连接口令’
- Mysql>:select user,host,password from mysql.user;
- Mysql>: grant all privileges on *.* to admin@"%" identified by '111111' with grant option;
八、测试
在其他 节点上(调度器和sql节点之外的电脑),ping 172.100.100.251发现可以ping通
这里选用的是172.16.48.201节点:
- [root@sg201 ~]# ping 172.100.100.251
- PING 172.100.100.251 (172.100.100.251) 56(84) bytes of data.
- 64 bytes from 172.100.100.251: icmp_seq=1 ttl=64 time=0.093 ms
- 64 bytes from 172.100.100.251: icmp_seq=2 ttl=64 time=0.164 ms
- 64 bytes from 172.100.100.251: icmp_seq=3 ttl=64 time=0.162 ms
在172.16.48.201上安装mysql客户端后,用命令 mysql -u admin -p -h 172.100.100.251测试发现可以 连接数据库,
将172.16.48.208上的mysql服务停掉后,这时在高度器上tail -f var/log/messages会看到调度器自动将无效sql节点移除lvs了
- May 30 11:04:11 sg204 Keepalived_healthcheckers: TCP connection to [172.16.48.208:3306] failed !!!
- May 30 11:04:11 sg204 Keepalived_healthcheckers: Removing service [172.16.48.208:3306] from VS [172.100.100.251:3306]
再将172.16.48.208上的mysql服务启动起来,这时
- May 30 11:06:53 sg204 Keepalived_healthcheckers: TCP connection to [172.16.48.208:3306] success.
- May 30 11:06:53 sg204 Keepalived_healthcheckers: Adding service [172.16.48.208:3306] to VS [172.100.100.251:3306]
哈哈!成功搞定


相关推荐
HAProxy+Keepalived+LVS实现负载平衡高可用集群最佳实践
lvs+keepalived+mha+mysql架构最佳部署手册
随着你的网站业务量的增长你网站的服务器压力越来越大?需要负载均衡方案!商业的硬件如F5又太贵,你们又是创业型互联公司...我们利用LVS+Keepalived基于完整开源软件的架构可以为你提供一个负载均衡及高可用的服务器。
Keepalived+LVS+Nginx
LVS+Keepalived+MySQL半同步主主复制高可用方案
安装配置LINUX集群,keepalived+lvs图文并茂详细讲解
NULL 博文链接:https://jdkleo.iteye.com/blog/2106210
MySQL+lvs+keepalived+mha架构配置实战演练
配置完Keepalived+LVS-DR模式后,输出文档以做备忘。
lvs+Keepalived+nginx高可用负载均衡搭建部署方案
lvs+keepalived+mha+mysql架构配置说明
MySQL主从复制+lvs与keepalived实现负载高可用
本人亲测的安装,系统为centos6.5-64 有需要的朋友可以下载
Keepalived+LVS+nginx搭建nginx高可用集群
本篇文章详细记录了Mysql双主热备+LVS+Keepalived高可用操作过程,可作为线上长期的实操手册.特此分享,希望能帮助到有用到的朋友.
负载均衡及服务器集群(Keepalived+Lvs)
文章目录1. mysql的主从复制高可用性解决方案MHA1.1 MHA配置1.2 mysql master 的配置1.3 mysql slave的配置2. client 的配置3. route 的配置4. 主DNS 的配置5. firewall 的配置6.... keepalived + lvs 实现 prox
在Keepalived + ipvsadm高可靠负载均衡架构中,keepalived负责实现High-availability (HA) 功能控制前端机VIP(虚拟网络地址),当有设备发生故障时,热备服务器可以瞬间将VIP自动切换过来,实际运行中体验只有2秒钟...
Nginx+keepalived+tomcat实现性负载均衡
Nginx+KeepAlived+Tomcat负载架构 这个可以实现tomcat集群,并且可以使服务器主备机进行切换。如果其中一台机器当机,会自动切换到另一台机器。客服端感受不到服务器当掉。非常实用。